
Gujiya is a quintessential North Indian dessert that holds a special place in festive celebrations and family gatherings. This delightful sweet is characterized by its golden-brown, crisp exterior and a rich, sweet filling of khoya and nuts. The choice between frying and baking gujiya adds a unique twist to the traditional recipe, offering options for those who prefer a more indulgent treat or a lighter version. This article provides a detailed Gujiya Recipe, encompassing both fried and baked methods to help you create these delicious treats right at home.
Gujiya Recipe Fried Baked Gujiya
Prep Time: 45 minutes
Cook Time: 30 minutes
Total Time: 1 hour 15 minutes
Cuisine: North Indian
Course: Desserts, Sweets
Diet: Vegetarian
Difficulty Level: Difficult
Ingredients:
For the Pastry Dough
- 1 cup whole wheat flour (120 grams)
- 1 cup all-purpose flour (125 grams)
- ¼ teaspoon salt
- ⅓ to ½ cup water (adjust as needed)
- 2 tablespoons ghee
For the Sweet Stuffing
- 1 cup khoya (tightly packed, 200 to 220 grams)
- ½ tablespoon ghee
- 10 almonds
- 10 cashews
- 10 pistachios
- ½ tablespoon raisins
- ⅓ cup powdered sugar (or confectioner’s sugar, adjust to taste)
- ½ teaspoon green cardamom powder (or 6 to 7 green cardamoms, powdered)
- Oil (for deep frying, as needed)
Instructions
Making the Pastry Dough:
- Combine the Flours: In a large bowl, mix together the all-purpose flour, whole wheat flour, and salt.
- Incorporate Ghee: Melt the ghee in a small pan or microwave until warm. Pour the ghee over the flour mixture.
- Blend the Ghee: Using a spoon, mix the ghee into the flours. Then, use your fingertips to rub and blend the ghee until the mixture resembles coarse breadcrumbs.
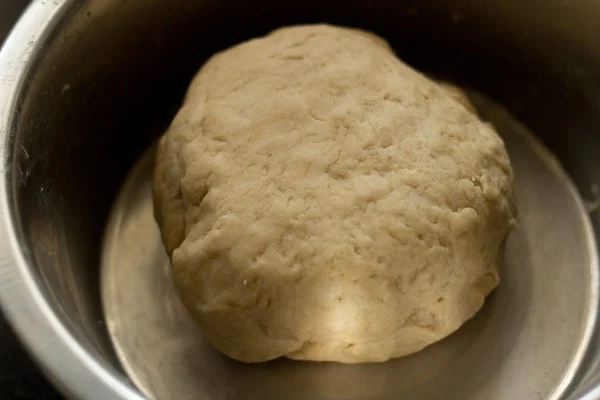
- Knead the Dough: Gradually add water in small amounts and begin kneading the dough. The amount of water required will depend on the flour’s texture and quality. Knead until the dough is firm and smooth.
- Rest the Dough: Cover the dough with a moist cloth and allow it to rest for 30 minutes.
Preparing the Sweet Stuffing
- Prepare the Khoya: Crumble or grate the khoya into small pieces.
- Chop Nuts: Finely chop the almonds, cashews, and pistachios.
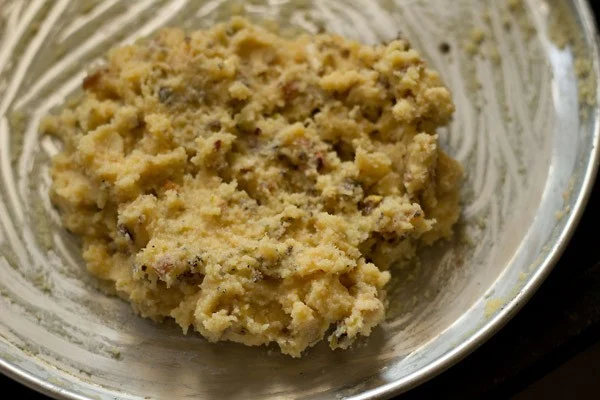
- Cook the Khoya: Heat ghee in a pan over low heat. Add the crumbled khoya and cook, stirring continuously until it begins to gather and thicken. Turn off the heat and let it cool to room temperature.
- Mix the Stuffing: Once cooled, add powdered sugar, chopped nuts, raisins, and cardamom powder to the khoya. Mix thoroughly. Feel free to increase the amount of sugar to adjust the sweetness to your taste.
Assembling and Shaping Gujiya
- Divide the Dough: Split the dough into two equal parts. Roll each part into a log and cut it into small, even portions.
- Shape the Dough Balls: Roll each portion into a ball and cover with a damp cloth to prevent drying.
- Roll Out the Dough: Lightly flour the rolling surface. Roll each dough ball into a small circle (4 to 5 inches in diameter). Use minimal flour to prevent sticking.
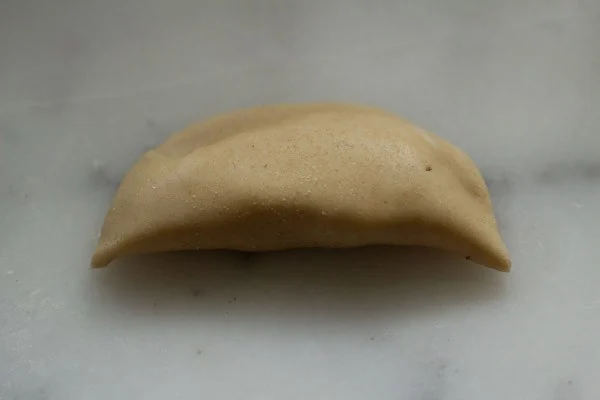
- Add Filling: Brush water around the edge of each dough circle. Place 1 to 1.5 tablespoons of the khoya filling on one half of the circle, leaving the edges clear.
- Seal the Gujiya: Fold the dough over the filling to create a semi-circle. Press the edges to seal. Use a gujiya cutter or pizza cutter to trim excess dough. For frying, create pleats along the edge to ensure a secure seal.
Baking Gujiya
- Preheat the Oven: Set your oven to 200°C (390°F).
- Prepare for Baking: Brush the gujiya with oil or melted ghee. Place them on a baking tray.
- Bake: Bake for 20 to 30 minutes, or until they turn golden brown. Check periodically to ensure even baking. Cool on a wire rack before storing in an airtight container.
Frying Gujiya
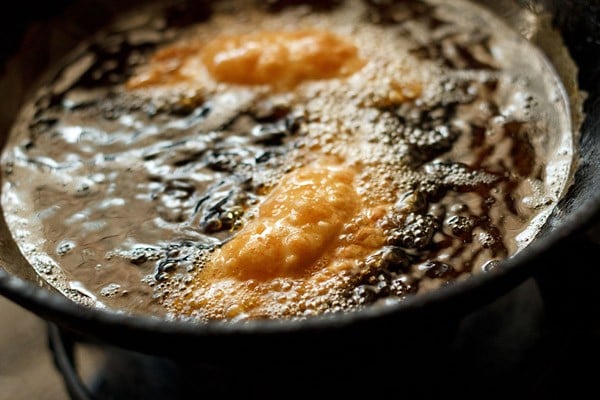
- Heat the Oil: Warm oil in a deep pan or kadai. Check if the oil is at the right temperature by dropping a small dough piece into it. If the dough rises gradually and consistently, the oil is ready. If it drops or bubbles excessively, adjust the heat accordingly.
- Fry the Gujiya: Slide the gujiya into the hot oil carefully, avoiding overcrowding. Fry in batches, turning occasionally until golden brown and crisp.
- Drain and Cool: Remove the gujiya with a slotted spoon and drain on paper towels. Allow them to cool completely before storing in an airtight container.
Serving Suggestions
Gujiya is perfect on its own or can be enjoyed with a side of Rabri (a thickened, sweetened milk) for an indulgent treat. Serve these delightful sweets to family and guests during special occasions and festive celebrations.
Storage
Once cooled, store gujiya in an airtight jar at room temperature for up to a few hours. Given the milk solids in the stuffing, it’s best to refrigerate leftovers for 1 to 2 days.
Notes
- Flour and Water: Adjust water quantity based on the type of flour used. For all-purpose flour, start with ¼ cup water, while whole wheat flour may require ⅓ cup or more.
- Dough Consistency: The dough should be firm to ensure a crisp texture. If it feels too soft, it may result in a soggy gujiya.
- Oil Temperature: Ensure the oil is at a medium temperature to avoid soggy or undercooked gujiya. Overly hot oil can brown the exterior too quickly while leaving the inside raw.
- Stuffing Variations: Customize your gujiya with additional flavors like thandai powder, gulkand (rose preserve), cocoa powder, or extra nuts.